Audio Basics for Hams, Part 5 – A Few Suggestions, and Signal Routing, Part the Second
If you’ve hung around all of the previous parts of this series, you’re probably starting to understand that getting a handle on audio is a little more complicated than plugging things up and hoping for the best. Getting things setup properly and working well takes time and experimentation, but it also takes knowledge and patience. With that in mind, this seems like a good time to take an interlude and make a few suggestions before before we jump into more mixer ideas. As I mentioned previously, these are my opinions, but they come from a decent bit of experience and a hope that they’ll help you make quick progress.
If you decide that you want to delve into the world of external audio stuff, my first suggestion is to make sure that you either have a decent set of external speakers, or a pair of good headphones with which you can listen to yourself. Notice I didn’t say “expensive.” There are a number of places to get highly-rated speakers or headphones that won’t cost you more than $25 and will do the job nicely. It’s really challenging to make appropriate adjustments to audio when you’re listening on a 25-year-old 3″ paper-cone speaker (although there could be a time and place for that!). The second suggestion is to record yourself speaking through your gear, regardless of what it is, before you put it on the air. There are a number of free audio recording programs for your computer, the most famous of which is called “Audacity” and is used for mono or stereo recording and editing. It’s available here if you want to check it out: http://audacityteam.org/. This software will let you record yourself and play back the result so that you get a decent idea of what you’re putting into your radio. If it’s not so good, you’ll be able to fix it before you subject anyone else to it!
My final, related suggestion will seem simple but is harder than you think: learn how to listen critically. By that I mean: learn how to cognitively break down the sounds you’re hearing into component pieces and evaluate them as you hear them. For example, you’ve probably heard your favorite song a million times, but have you ever stopped to think about the parts that actually make it up? What instruments are playing at any given time? How loud is the acoustic guitar when it comes in, relative to the loudness of the lead vocal? Where is that guitar in the stereo image- left, right, center, center-left, etc.? You might not think any of that relates to getting your voice on the air in ham radio, but it would be really challenging to make good decisions about gear and/or voice sound if you’ve never put any thought into the qualities you want your on-air voice to have- you won’t have any frame of reference. I only suggest listening critically to music because most of us listen to it regularly anyway and it’s a good way to teach yourself how to focus. You can also listen to on-air broadcasting talent to see what qualities make certain voices memorable. Mind you- I’m not saying that you should aspire to sound like a movie announcer; as some readers have suggested, we have limited bandwidth on sideband anyway. But taking the time to learn how to listen critically might just give you some ideas about how to make beneficial adjustments to your setup that could help both on your nightly net or your DX adventures. That’s not to mention that improving your listening skills could come in handy while trying to make those fun weak-signal contacts! I believe that you can train your brain to be a better filter than anything inside your radio.
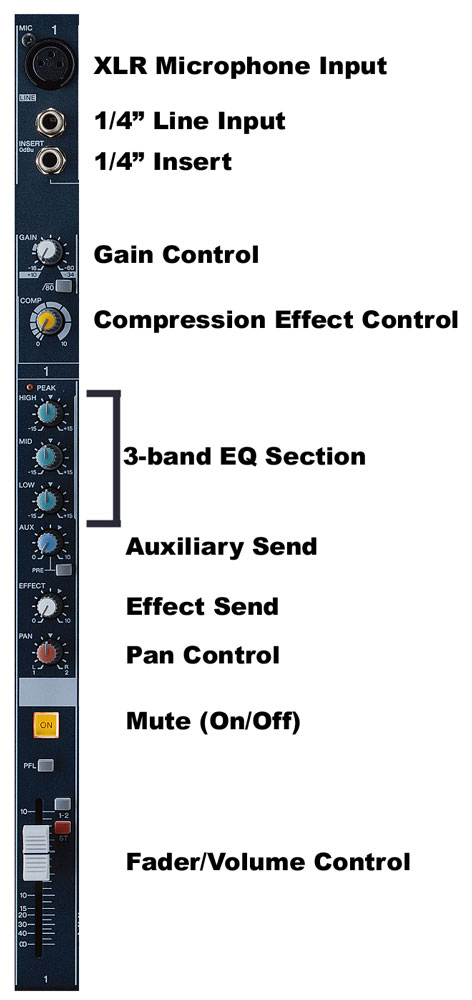
Alright, enough of that for now. Last week I gave a high-level overview of mixers and how they work. I made a bit of a big deal about gain stages, getting your gain setup properly, and so on. In the end, though, we basically got a microphone signal into the mixer, down to the main bus, and out the main outs. That’s OK if you’re just going to use your mixer as a hybrid preamp/EQ setup, or want to use it to mix multiple signals to one output. But what if you want to route signals to additional outputs for other uses, or you need a second, separate mix for some reason? Most mixers have additional buses that can be used as separate mixes for separate purposes. Generally speaking, these buses are called Aux Sends, with “aux” being short for “auxiliary.” They’re often called “sends” because they can be paired with “returns” if the situation arises. Returns are used when the send is feeding audio to an external processor like a reverb unit (don’t do this ham friends!) and the processed audio needs to get back into the main mix. The audio comes back into the mixer via the return jack and corresponding pot. With all of that said, aux sends can be used without a return in the same way you would use the main audio bus, but instead of having a fader to control the amount of signal being sent to the bus, there’s usually a pot within each channel’s strip. If you refer back to the diagram from last week, you’ll see that this setup has one aux knob under the EQ section:
 Source: http://www.world-of-songwriting.com/mixing-songs.html
Just like with the channel fader and main output, once you put signal onto the aux bus, it goes to its final gain stage which is normally labeled “Aux Main” or “Aux Send” and lives in the mixer’s Main Mix section (where all of the pots for the final gain stages live). The signal is then outputted on one of the mixer’s jacks that’s labeled “Aux Send” or something like that.
So what’s the point of using the aux bus? There are a lot of reasons that you might want a completely separate mix. Here’s a real-life example: suppose you have multiple sources like your HF radio, your VHF radio, your computer output, your iPod, etc. that you want to hear through your speakers because they sound gooooood. Let’s also assume that your favorite mic is connected to a channel on your mixer, and you have your speakers connected to the main outputs of your mixer (or to the monitor outputs, which are usually affected by the main fader). What would happen if you took the mix of all of that and put it directly into your HF radio? If you did that, the signal that you’d be transmitting would contain sound from your mic, but it would have audio from all of the other sources also. You could adjust the faders and turn off the channels that you didn’t want to transmit every time, but if you were using D-star to spot for your friend and were listening to it through your mixer, it would be pretty cumbersome to be constantly adjusting faders each time you spoke. In this situation it would be a lot easier to send your microphone channel down an aux by itself and then send that output to your rig, thereby leaving the faders in the same spots so you can hear all of your inputs simultaneously.
There is one other little thing about auxes that you should know. It’s hard to see on that picture, but there is a tiny little button beneath the “Auxiliary Send” pot that says “Pre” on it. This button has a very important purpose: to determine whether the level of the signal you’re sending to the aux bus is affected by the level of that channel’s fader or not. In this example, when the button is depressed (i.e., the channel is in “pre” mode), the signal level that’s sent to the aux bus will be whatever it is immediately following the aux knob and is not affected by the fader at all. So, if you have that pot at 100%, the signal going to the aux bus will be 100% of the signal that was sent there by the preamp, and so on. In other words, the signal is “pre,” or taken before, the fader. Alternately, if the button is not depressed (sometimes called “post” mode), both the aux knob and the channel’s fader will have an effect on the signal level sent to the bus. You could have the aux knob at 100% but have the channel’s fader pulled all the way down to 0% and no signal will be sent to the aux bus. The two gains work in concert with one another. So how can this help? It’s really only useful when the amount of signal going to the aux send needs to be related to the amount of signal in the main mix. There’s not really a good use of it in our setup, but in other audio situations it might make sense to make the amount of aux signal that’s sent to a reverb processor, for example, dependent on the amount of signal in the main mix. In this situation, when the channel is in “post mode,” the amount of reverb would follow the amount of signal going to the main output because the two are related. My hunch (although I am always happy to be shown a better way!) is that most hams will use the aux bus as an entirely separate mix, so the “pre” button will probably always be on. Some mixers might label it “Pre/Post,” but you get the idea.
Onto equalization here!


Got something to say?
You must be logged in to post a comment.